The Verus CLI (Command Line Interface) Wallet is used for scripting and automation, as an interface to applications utilizing or providing services relating to Verus, and by power-users who want maximum control over their wallets or want to run Verus on headless systems. This series of posts is written for the Linux environment, and may have details specific to the Bash shell, but the principles should translate well to other environments. If you’re new to the Linux command line you might want to look up some intros to get some foundational principles down (directory navigation and piping in particular) so you’ll have an easier time following along.
Core Principles
There are two main components to the Verus CLI wallet. verusd is the “Verus Daemon,” which runs in the background, talking to peers on the network to exchange transaction and block information, validating that information, keeping your wallet information loaded up and ready to create transactions, and providing the interface for the user or scripts/software to talk with it to interact with the Verus network/blockchain. verus is the CLI RPC (remote procedure call) interface used on the command line to talk to verusd. The same verusd used for command-line operation is also the core component that runs under the hood of the Verus Desktop wallet.
verusd must be running in order to run commands using verus, and to keep up to date with the network in real-time or to stake or solo mine. It is important to make sure verusd is shut down gracefully whenever possible. Any case where verusd exits unexpectedly can cause corruption of your copy of the blockchain data, or even your wallet file (we’ll get into how to make wallet backups). This can happen in the event of a power loss, a forced restart after an OS update, a crash, or when you kill the verusd process instead of stopping it.
When verusd loads it takes a little while to load and verify cryptographic parameters, blockchain data, and your wallet information. How long depends entirely on your hardware, particularly the speed of your processor and storage read speed. Once it’s running it should continue running, but should be checked periodically to make sure it still has connections and is synced and up-to-date with the network.
Terminology
Let’s start with some useful definitions that will give us some language to work with.
- Daemon – This comes from standard UNIX/Linux terminology for a background process. verusd is the Verus daemon that runs in the background; it is the reference implementation for the Verus protocol.
- RPC interface – Remote Procedure Call – in this context this refers to both the protocol to communicate with verusd using any http capable tool, and to the verus command-line RPC tool that provides the human-interface for interacting with Verus on the command line.
- Node – Every instance of verusd connected to the global, decentralized, P2P Verus network is considered a node in the network.
- Public Node – A node that is accessible for other nodes to initiate connections with. This either means running on a computer with a public IP address (and appropriate ports opened in the firewall) or if you’re on a private network (such as in a home or office), having ports forwarded in your router.
- Peer – A peer is generally a node you have an active connection with. It is important to remember that when you’re running a node in the network it is a true peer to the other nodes, you are playing a role in the operation of the network, both in validating and communicating transactions and blocks, and in helping other peers discover each other, and most importantly expanding the network to improve fault tolerance and resiliency.
- Native Wallet – A native wallet is one that has a copy of the blockchain data and communicates with peers on the network. The Verus CLI wallet only supports native wallets.
- Chain Tip – The newest, most “powerful” (as in Proof-of-Power) block on the network. If you are synced up to the chain tip you are fully synced on the network.
- Lite Wallet – A lite wallet is one that does not keep a copy of the blockchain or communicate directly with peers on the P2P network. Instead it communicates with servers that run their own Daemons for you to utilize. Staking and mining are not possible with a lite wallet, nor are many advanced features. Lite wallets are generally used for mobile apps or may be used in Verus Desktop.
Responsibility
As noted in the definition of “Peer” above, when you’re running the Verus CLI wallet, you’re operating a node of the peer-to-peer network and are a peer in every sense. You have as much responsibility as everyone else on the network to make sure you keep your software up to date and monitor the health of your node. When nodes aren’t updated for network upgrades over long periods of time they can become disconnected from the rest of the network, or even get separated into a smaller “fork” network with peers in similar condition. If this happens it means you’re not participating in the real network, and any transactions you make, or mining and staking you do, aren’t really happening on the real network, though it may appear as though everything is working. It also means that any information from the network you’re relying on may be inaccurate or missing. Please make sure to keep your nodes updated, both for you and for the health of the network.
Downloading, Verifying, and Extracting verusd
To download the Verus CLI wallet go here: https://verus.io/wallet and download the Verus CLI wallet for your operating system/architecture. If you want to download using the command line you can right click on the link in the dropdown there and select copy link, then go to your terminal and use wget <URL> where <URL> is the URL you copied pasted in.
Once downloaded you’ll need to extract the files, which can be done with tar xvzf Verus-CLI-Linux-vX.X.X-X-x86_64.tgz, of course substituting the filename for the one you downloaded. You should now have a file by the same name, but ending in .tar.gz and another ending in .tar.gz.signature.txt.
In the terminal use cat Verus-CLI-Linux-vX.X.X-X-x86_64.tar.gz.signature.txt, replacing the filename or course. Now in a browser navigate to https://verus.io/signatures, which can be found in the resources menu if you’d prefer to navigate directly.
On that page, click on the “File” tab, then click in the upload box to select the Verus-CLI-Linux-vX.X.X-X-x86_64.tar.gz file (the one with the filename that matches the .signature.txt file). In the VerusID field enter Verus Coin Foundation Releases@ (with spaces – this is the official release signer). Now go back to your console where you have the signature information and copy the signature (without the quotes) and paste into the signature field on the website then submit. You should get confirmation that the signature is valid, which will confirm your download is an official release.
If you don’t get confirmation of a good signature please seek support in the #support channel on the Verus Discord, folks there should be able to help sort out what’s going on.
In the future once you’ve got Verus running and have your own copy of the blockchain to validate against you’ll be able to verify the signature of a new release yourself, without using the web interface. We’ll take a look at this in a future post about Verus ID from the command line.
Once your downloaded release is verified you’ll extract the .tar.gz file, which should result in a directory named verus-cli.
Dependencies
Note: Since this was written most major Linux distributions now seem to include libgomp1 in recent releases. You can skip this part and just come back here if you get an error message about missing libgomp.
To get started you’ll need to make sure you have any dependencies installed. On relatively new releases of Ubuntu/Debian you’re unlikely to need to need anything extra. If you get a complaint about libgomp when you try to run verusd, that can be installed using:
sudo apt install libgomp1There are a few other packages I would recommend for more advanced usage, which we’ll cover later on in this series – those are tmux, jq, bc, and moreutils, which can be installed using:
sudo apt install tmux jq bc moreutilsIf you’re using another distribution you’ll need to use your package manager and may have other dependencies that are needed.
Installing and Running
Verus doesn’t need to be installed in any particular place, you can run it from anywhere. My recommendation is to place the verus and verusd executables in a location within your system PATH, which will allow you to run them without specifying a path. On most Linux systems the bin directory within your home folder is a decent choice, and should be in your PATH if it exists (or if you create it).
If that path works for you, move verus and verusd from the verus-cli directory to ~/bin using:
mv verus-cli/{verus,verusd} bin/Protip - In the future when you're upgrading to a new release if you use mv to move as above (instead of cp to copy) you can perform the action before shutting down the verus daemon, overwriting the executable so you can shut down and immediately relaunch with the new binary.
The first time you run verusd it will create the directory ~/.komodo/VRSC as a location to store your wallet, blockchain data, temporary data files, log files, and other information. It will also create a the directory ~/.zcash-params which is where it stores some cryptographic information used by Verus and other blockchains with ZCash in their lineage.
On first run, verusd will go out and download the zcash-param data, which can take a while. This is necessary to run Verus.
If you like, you can also ask verusd with the -bootstrap option to download a compressed copy of the blockchain called a bootstrap. Starting with a bootstrap reduces your time to get up and running and reduces load on the network, so it is generally recommended, but not necessary. You’re also welcome to start without the bootstrap and wait for your node to sync the blockchain through peers, which is the trustless solution.
When you run verusd you also have the option of keeping it resident in the terminal or running it in the background by passing the -daemon option at startup. If you keep it resident in the terminal be aware that you won’t be able to close the terminal without killing verusd.
My recommendation for starting verusd the first time is to run using:
verusd -daemon -bootstrap &>/dev/nullThis will run verusd in the background (-daemon), fetch and install the bootstrap (-bootstrap), and redirect the output to /dev/null (a bottomless black hole) since it will be backgrounded anyway (and you probably don’t want it printing messages to you and interrupting your shell session). This first time will take quite a bit longer than normal because of the downloads, decompression, etc.
You can watch the progress of your automated downloads (the zcash-params data and boostrap) by watching the log file. To watch it in real-time use:
tail -f ~/.komodo/VRSC/debug.logPress CTRL-C to stop watching the log.
If you need to check to see if verusd is running try:
pidof verusd– which will return the process ID for verusd if it is running, or will return nothing if it is not.
Other than watching the debug log you won’t be able to interact with verusd until it has finished the downloads and started loading and verifying the block data.
Running Verus Commands
Verus commands are issued using the verus executable, followed by the command and any arguments for the command.
If you have just started Verus and get an error, but verusd is still running (verify with pidof as mentioned above) it probably means verusd just hasn’t finished loading yet.
The first command to know is stop. As mentioned earlier, it is very important to shut Verus down gracefully when possible. This is how. Run this on the command line:
verus stopverusd will take a moment to stop while it closes connections and writes data to disk. If you’re waiting on verusd to close (such as when restarting a system or upgrading Verus) you should watch for the process to end using pidof.
Apart from stop, the most important Verus command is help, which will give an exhaustive list of the many commands available. Calling help with another command as an argument will provide help text for that command.
verus help– produces a list of available commands grouped by categories.
verus help getinfo– produces the help output for the getinfo command.
Checking sync and connection status with getinfo
The most informative command for verusd is getinfo. This gives you information about your network connectivity, your blockchain data sync status, verusd version number, port numbers, and other information.
verus getinfoYou should see something like the following:
{
  "version": 2000753,
  "protocolversion": 170009,
  "VRSCversion": "0.9.1-1",
  "notarized": 1980784,
  "prevMoMheight": 1980784,
  "notarizedhash": "000000000000f8e4711257e9be4c9d48851b3e95d6a1da59407a73b7e135d948",
  "notarizedtxid": "606068d19eac5080ad3c50fa7e2224a3f751183978d9d2caaae815d4bf9cf6c1",
  "notarizedtxid_height": "mempool",
  "KMDnotarized_height": 0,
  "notarized_confirms": 0,
  "walletversion": 60000,
  "blocks": 2057229,
  "longestchain": 2057229,
  "timeoffset": 0,
  "tiptime": 1649633184,
  "connections": 5,
  "proxy": "",
  "difficulty": 4682676286725.309,
  "testnet": false,
  "keypoololdest": 1638822194,
  "keypoolsize": 1,
  "paytxfee": 0.00010000,
  "relayfee": 0.00000100,
  "errors": "",
  "CCid": 1,
  "name": "VRSC",
  "p2pport": 27485,
  "rpcport": 27486,
  "magic": -497513811,
  "premine": 0,
  "eras": 3,
  "reward": "0,38400000000,2400000000",
  "halving": "1,43200,1051920",
  "decay": "100000000,0,0",
  "endsubsidy": "10080,226080,0",
  "veruspos": 50
}
To assess your sync status start by looking at connections. This is the number of network peers (nodes) you’re connected to – if you have zero peers it’s unlikely you’re up to date, even if only slightly behind.
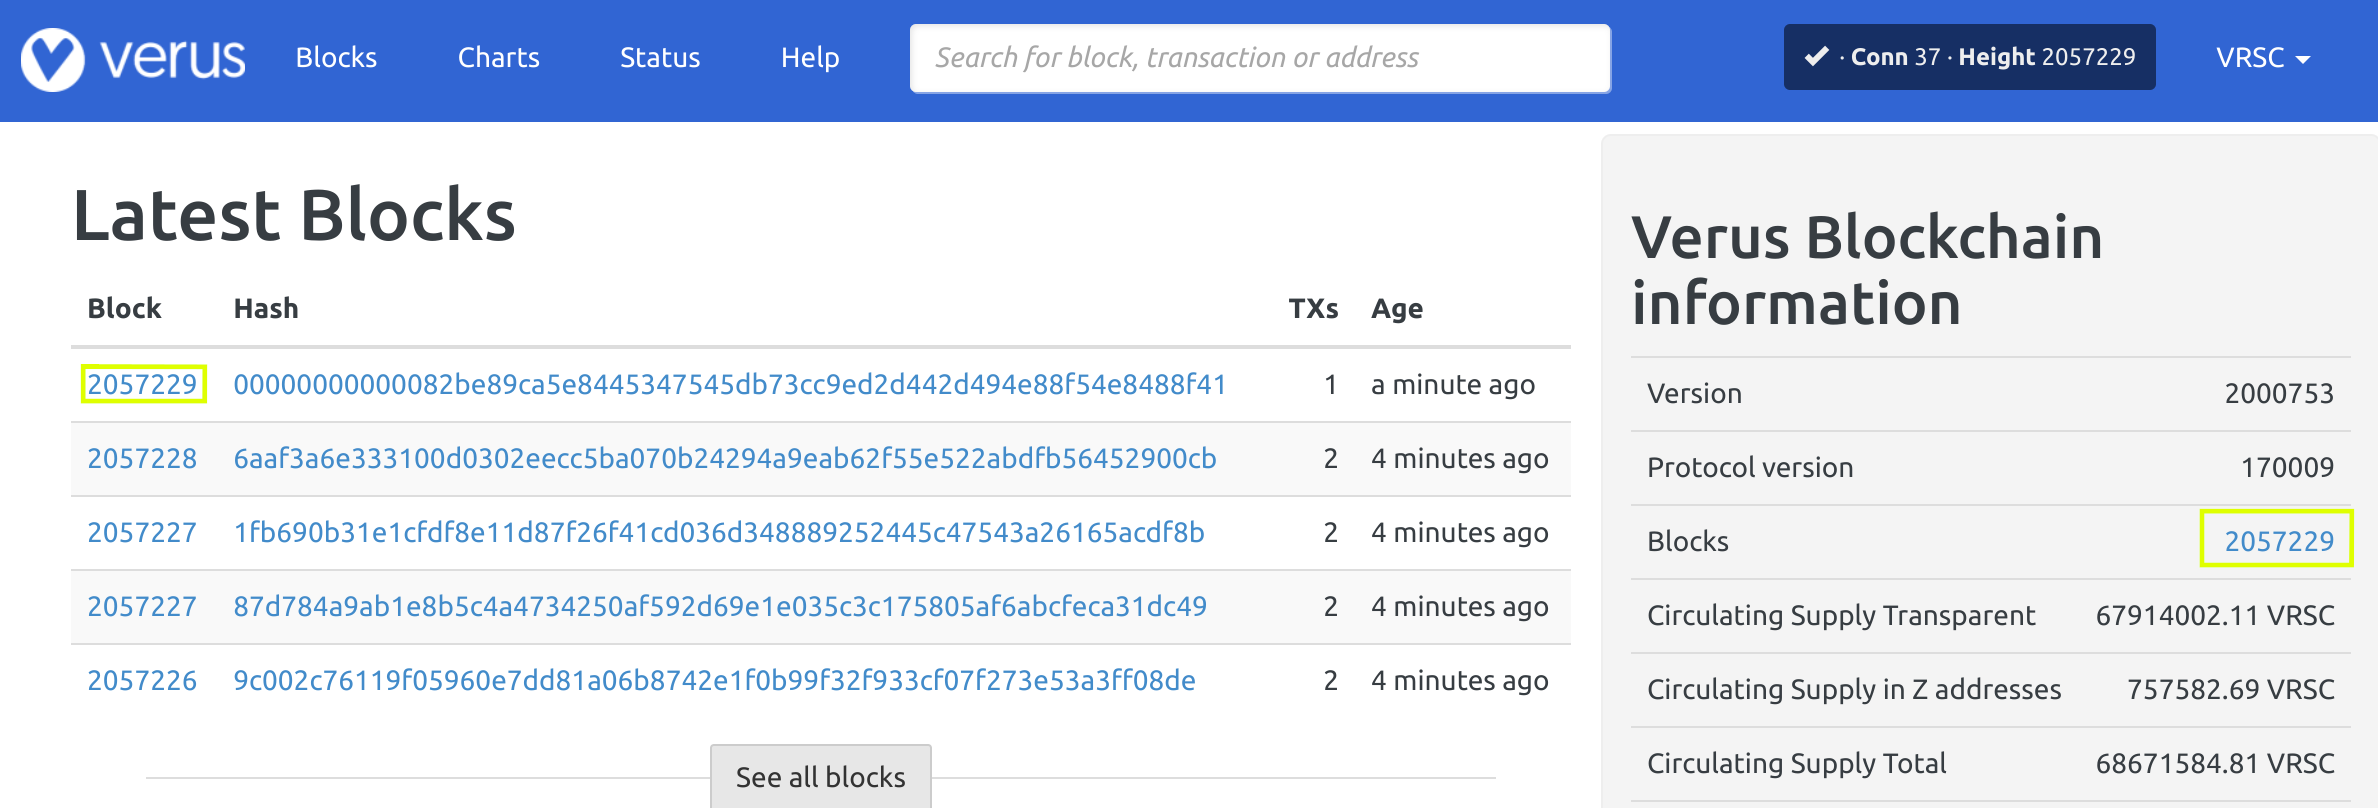
Now take a look at blocks and longestchain. Longestchain indicates the highest-height block on the network, which may be the chain tip, or just the newest block your daemon has become aware of so far. Blocks is the number of blocks your daemon has synced and validated. To determine if you’re synced with the network you’ll need to check your longestchain value against an authority like an explorer. For example, at insight.verus.io you could find the current block height in the spots marked in yellow here:
Alternatively you could ask someone you know for the current block height or check against another system running Verus if you have access to one. Regardless of where you get your reference for the current block height, if your longestchain value matches, and your blocks value does as well it means your daemon is aware of the complete chain and has all of the chain data – you’re in sync.
What to do if you’re not in sync
Sometimes it can take a little while to find peers and/or sync block data. If you have zero peers you won’t stay in sync even if you were synced previously. Usually if you wait a while (a couple hours) your daemon will find peers and begin syncing. If that’s not the case it might be worth checking in with the Verus community on Discord to see if anyone can recommend a peer to connect to manually.
To manually connect to a peer you would issue the following command:
verus addnode <IP:PORT> addReplace ‘<IP:PORT>’ with the IP address and port number (only needed if the node is running on a port other than the default) of the server to connect to. This will manually make your daemon aware of that node. It may not reach out immediately, but if you’re impatient you can force that by running:
verus addnode <IP:PORT> onetryThis will immediately attempt to connect to the other node, and won’t return the shell to you until it has either connected, been rejected, or timed out.
If you’ve got peers and aren’t syncing, be patient. Wait a few hours and see if you get caught up. If you still have peers but aren’t fully synced try restarting verusd (verus stop, then restarting verusd).
If you have a private node (one that is on a private network without the Verus P2P port forwarded, or if that port is firewalled off on the local machine) you’ll only be able to form outbound connections. The Verus daemon will only initiate up to five outbound connections. Making your node publicly accessible (by making sure the Verus P2P port is open on your firewall and either running on a public network or forwarding the Verus P2P port to your node in your router) will usually yield a higher connection count as you may still form up to five outbound connections, but can now accept many more inbound connections. If you have trouble maintaining connections, making your node public can help a great deal. Just make sure your RPC port is firewalled off and inaccessible by others. Running a public node also helps strengthen the network, as it provides a node that others running on private networks can connect to.
Checking signatures and upgrading Verus
After you’re up and running you’ll occasionally need to update Verus. Remember the responsibility part above? To upgrade Verus just download the newest version, extract it, check the signatures, and install it over the old version, then make sure to restart verusd.
After downloading the newest version and extracting you should have a new .tar.gz archive and a signature file. You can verify the signature as we did above using the website, or, now that you have Verus running you can verify it against the blockchain yourself.
To verify the signatures on the release you’ll extract the archive using (replacing the filename with the correct name for the file):
tar xvzf Verus-CLI-Linux-v0.9.2-3-x86_64.tgzThat should extract Verus-CLI-Linux-v0.9.2-3-x86_64.tar.gz and Verus-CLI-Linux-v0.9.2-3-x86_64.tar.gz.signature.txt.
Now let’s print the signature file to the terminal so we can check the details:
cat Verus-CLI-Linux-v0.9.2-3-x86_64.tar.gz.signature.txtThat should print out something like this:
{
  "hash": "09acebdf580f34b322561c247ebbb60a1c975453d4766abbec9229558201a96e",
  "signature": "AXQSHwABQR+gAuS5YkkVHiKCAjLwqpTNxAxo3wBjRDcYfQ0SqWenTgIB+HA3UUbJkC7qH5YZamiRrr3wOmFwdl6z7OPbXBDk",
  "signer": "Verus Coin Foundation Releases@"
}
I would recommend always checking the signer yourself, and typing the signer yourself when checking signatures. This will prevent someone using a signer that looks very similar from tricking you if you copy/paste. So you’ll type the signer, copy and paste the signature (with quotes), and specify the path to the file. The path is an absolute path (like /home/username/Downloads/…); in the command below the $(pwd) supplies the necessary path before the file name. To verify the signature for the new wallet file run:
verus verifyfile "Verus Coin Foundation Releases@" "AXQSHwABQR+gAuS5YkkVHiKCAjLwqpTNxAxo3wBjRDcYfQ0SqWenTgIB+HA3UUbJkC7qH5YZamiRrr3wOmFwdl6z7OPbXBDk" $(pwd)/Verus-CLI-Linux-v0.9.2-3-x86_64.tar.gzIt will either say true or false. If it says false please immediately seek support from the community in the #community-support channel on Discord. Either you’ve done something wrong (and people can help you) or you’ve got an illegitimate download (and should not under any circumstances run it).
If it says true then you’re good to go. You can extract the file, which will create the verus-cli directory containing the files you care about. Extract, move the executables (verus and verusd) over the old ones, and restart verusd. After you have moved the files you no longer need the verus-cli directory or any of the other files in it, so you may delete them immediately to clean up.
tar xvzf Verus-CLI-Linux-v0.9.2-3-x86_64.tar.gz
mv verus-cli/verus ~/bin/
mv verus-cli/verusd ~/bin/
rm -rf verus-cli
verus stop
#wait until verusd has actually stopped
verusd -daemon &>/dev/null
Quick BASH pro-tip – the reason we move (mv) the files rather than copying (cp) them is that since verusd is already running it won’t allow you to cp a file over top of it, but it will allow you to mv a file over top because of how file handles are managed. You could alternatively stop verusd and wait for it to exit completely, then cp the files into place if you prefer.
Wrap-up
At this point you should have a running, synced Verus node. In the next post we’ll explore the basics of performing and viewing transactions and viewing block data.